


Enhancing Your Outdoor Living with a Professional Brick Paver Patio Installation
Looking to upgrade your outdoor space with elegance and longevity? A brick paver patio could be the perfect solution. These patios not only add beauty and value to your property but also provide a durable and versatile option for your landscaping needs. Hiring a professional company like JM Mento Landscape Design ensures that every aspect of the installation process is taken care of, from design to completion.
Why consider a professional installation?
- Convenience: Coordinating such a project on your own involves numerous steps and coordination of different trades. A professional service simplifies this process.
- Expertise: Professionals bring your vision to life with precision, ensuring all codes and regulations are met.
- Quality: High standards of materials and craftsmanship are guaranteed, enhancing the longevity of your patio.
- Customization: Experts can tailor the design to suit your personal style and the functionality you need, making your outdoor living space truly unique.

Choosing JM Mento Landscape Design means opting for a hassle-free experience, leaving you more time to enjoy your beautiful new outdoor area.
Choosing the Right Materials
When it comes to installing a brick paver patio, selecting the right materials is crucial for both the aesthetics and longevity of your outdoor space. Let’s break down the essentials you’ll need for a successful project.
Paving Bricks
The heart of your patio lies in the paving bricks. Opting for high-quality, outdoor-rated bricks ensures durability against the elements. Regular paving bricks or brick pavers, measuring 4 inches wide by 8 inches long by 2 inches thick, are ideal. They’re designed to withstand heavy foot traffic and diverse weather conditions.
Patio Edging
Patio edging is not just for looks; it plays a key role in keeping your patio bricks in place. Edging materials can vary from metal to plastic or even stone, depending on the design and functionality you desire. It’s important to choose sturdy edging that complements your bricks and overall patio design.
Gravel
Beneath the beauty of your patio lies the gravel layer, crucial for drainage and stability. A layer of 3/4″ crushed stone or recycled concrete provides a solid foundation, ensuring your patio remains even and free from water pooling.
Landscape Fabric
To combat weeds and separate the gravel from the sand layer, landscape fabric is a must. This fabric acts as a barrier, preventing weed growth while still allowing water to drain through, keeping your patio looking pristine.
Sand
Sand serves as a cushion for your paving bricks, allowing for minor adjustments to ensure a level surface. A 2-inch layer of sand over the landscape fabric provides the perfect bed to lay your bricks. The sand layer should be smooth and even, achieved by using a two-by-four as a screed.
Polymeric Sand
After laying the bricks, polymeric sand is used to fill the joints. This specialized sand contains additives that, when moistened, harden to lock the bricks in place and prevent weed growth. It’s the final touch that ensures the stability and longevity of your patio.
Choosing the right materials for your brick paver patio is a step you can’t afford to overlook. With JM Mento Landscape Design, you’re assured that only the best materials are selected for your project. Our expertise ensures that every layer, from the gravel to the polymeric sand, is meticulously applied for a patio that not only looks fantastic but lasts for years to come.
In the next section, we’ll delve into Planning Your Patio Design, covering everything from adhering to codes and regulations to determining the slope and layout lines. Stay tuned to learn how JM Mento Landscape Design can bring your vision to life with precision and style.
Planning Your Patio Design
When envisioning the perfect outdoor space, a brick paver patio stands out for its durability and aesthetic appeal. However, before the first brick is laid, thoughtful planning is essential. This section will guide you through the key steps in planning your patio design, ensuring a seamless installation process by a professional team like JM Mento Landscape Design.
Codes and Regulations
First things first, understanding the codes and regulations in your area is crucial. Different regions have specific requirements that might affect your project. For example, certain areas might restrict the size or location of your patio.
Contacting local authorities or a professional landscaping company can provide clarity. JM Mento Landscape Design has experience navigating these regulations and can ensure your project complies, saving you from potential headaches down the line.
Slope
Next, consider the slope of your patio. A proper slope ensures that water runs off your patio, preventing pooling and potential damage. The recommended slope is 1/4-inch per linear foot of patio length. For instance, if your patio is 10 feet long, it should have a slope of 2.5 inches from one end to the other, ideally away from your home to prevent water damage to your foundation.
Layout Lines
Layout lines are your next step. These are crucial for defining the shape and boundary of your patio. Using stakes and mason’s line, mark out the perimeter of your patio based on your design. This visual guide helps in adjusting your design as needed and ensures that the excavation and installation process aligns with your vision.
For accuracy and efficiency, professional installers like JM Mento Landscape Design use advanced tools to ensure that these lines are perfectly aligned and match your desired patio design.
Excavation Depth
Excavation depth is another vital aspect of your patio planning. The depth needed depends on several factors, including the thickness of your pavers and the base material layers (gravel and sand). Typically, excavating 8 inches below the desired final patio surface allows adequate space for the base materials and pavers.
Professionals ensure that the excavation is even and follows the planned slope, providing a solid foundation for your patio. Hiring a professional team ensures that this step is done correctly, as uneven or insufficient excavation can lead to issues down the line.
By covering these essential aspects in the planning phase, you’re setting the stage for a successful patio installation. Working with a professional landscaping company like JM Mento Landscape Design not only ensures that these critical planning steps are meticulously followed but also brings your vision to life with expertise and precision.
We’ll explore the actual Laying of the Bricks, where your planned design begins to take physical shape. Stay tuned to see how your dream outdoor space becomes a reality.
Preparing the Site
Now that we’ve planned our brick paver patio, it’s time to prepare the site. This step is crucial for a stable and long-lasting patio. Let’s dive into the tasks: excavating, laying the gravel base, adding landscape fabric, and spreading the sand layer.
Excavate
First things first, we need to dig. But, don’t worry, when you hire a professional company like JM Mento Landscape Design, they handle all the heavy lifting. They’ll dig up to 6-12 inches depending on your patio’s needs, ensuring there’s enough room for the base materials and pavers. This step is essential for drainage and stability, preventing your patio from turning into a mini pool or shifting over time.
Gravel Base
Next up is the gravel base. This layer is the backbone of your patio, providing a firm, level ground for your pavers. JM Mento Landscape Design uses high-quality gravel, compacting it to prevent any future sinking or shifting. This process ensures your patio stays level and looks great for years to come.
Landscape Fabric
After the gravel, it’s time for the landscape fabric. This magic layer stops weeds from popping up between your beautiful bricks. It’s a simple addition that makes a big difference in maintaining the clean look of your patio without constant weeding.
Sand Layer
Finally, we spread a layer of sand over the landscape fabric. This sand acts as a bed for your pavers, making sure they’re snug and level. The team at JM Mento Landscape Design knows exactly how to smooth and level this layer, preparing a perfect canvas for the brick laying to come.
By choosing a professional team for your brick paver patio installation, you ensure these critical steps are executed flawlessly. It’s not just about digging and dumping materials; it’s about crafting a solid foundation that supports your outdoor living dreams. With JM Mento Landscape Design, you’re not just getting a patio; you’re investing in a durable, beautiful space designed for making memories.
As we move onto the next section, Laying the Bricks, you’ll see how your well-prepared site transforms into the patio you’ve always wanted. Stay tuned as your vision starts to take shape, brick by brick.
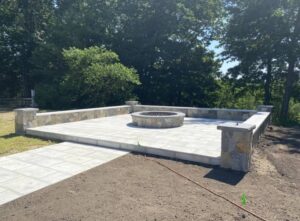
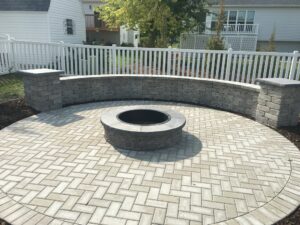
Laying the Bricks
Now, the exciting part begins. It’s time to lay the bricks and watch your brick paver patio come to life. This step is where precision meets design, and with the right approach, your patio will not only look stunning but last for years. Let’s dive into the process.
Starting with the First Row
The first row of bricks sets the tone for the entire patio. It’s crucial to start straight and level. If you’re not confident in your ability to keep things aligned, consider hiring a professional team like JM Mento Landscape Design. They’ll ensure that this crucial first step is done correctly, preventing issues down the line.
- Begin at a corner or an edge that’s most visible.
- Use a string line or a long, straight board to ensure the first row is perfectly aligned.
- Double-check the level and adjust as necessary.
Laying the Remaining Bricks
Once the first row is down, the rest of the bricks follow. This is where the pattern you’ve chosen comes into play. Whether it’s a simple Basketweave or a more complex Herringbone, the pattern adds character to your patio. A professional installation team will have the expertise to execute these patterns flawlessly, ensuring each brick fits snugly and maintains the overall design integrity.
- Basketweave is ideal for beginners and offers a classic look. It involves alternating horizontal and vertical pairs of bricks, creating a woven appearance.
- Herringbone is more intricate, with bricks laid at 45 or 90 degrees to form a zigzag pattern. This pattern is not only aesthetically pleasing but also provides excellent interlock, making it suitable for areas with heavy foot traffic.
Tips for a Successful Installation
- Keep it tight. Ensure there are minimal gaps between the bricks. This reduces shifting and makes the patio more durable.
- Stay level. Regularly check that the bricks are flat and level. A rubber mallet can be used to gently tap the bricks into place.
- Cutting bricks. Sometimes, you’ll need to cut bricks to fit the edges or around obstacles. This step requires precision and the right tools. Professional installers like those from JM Mento Landscape Design come equipped with the necessary equipment to make clean, precise cuts.
Why Professional Installation Makes a Difference
While laying bricks might seem straightforward, achieving a perfectly level and beautifully patterned brick paver patio requires skill and experience. Here’s why considering a professional service like JM Mento Landscape Design can be beneficial:
- Expertise in Patterns. Professionals can lay complex patterns quickly and efficiently.
- Precision Cuts. They have the tools and know-how to make precise cuts, ensuring a polished look.
- Time-saving. A professional team can complete the job faster, allowing you to enjoy your new patio sooner.
- Problem-solving. If issues arise, professionals can address them on the spot, ensuring your project stays on track.
As your bricks are laid down and your patio starts taking shape, it’s clear that this isn’t just any addition to your home—it’s a transformation of your outdoor living space. With the bricks laid down, we move on to the Finishing Touches to seal and protect your investment, ensuring it stands the test of time. Stay tuned as we bring the final touches to your brick paver patio, making it ready for years of enjoyment.
Finishing Touches
After the bricks of your brick paver patio are perfectly laid out, the next steps are crucial to ensure durability and a polished look. Let’s dive into the final stages of installation, focusing on Polymeric Sand, Moistening, and Backfill Edging.
[Polymeric Sand](https://en.wikipedia.org/wiki/Pavers_(flooring)
This is where your patio really starts to come together. Polymeric sand is a special kind of sand mixed with additives that, when moistened, harden to lock the pavers in place. This serves multiple purposes:
- Prevents weed growth: No one likes weeding, especially not in their beautiful patio.
- Blocks ants and other pests: Keeps your patio pest-free.
- Stabilizes pavers: Reduces shifting and movement over time.
To apply, spread the sand over the bricks and sweep it into the cracks. Be thorough, as every joint needs to be filled. This might seem like a simple step, but it’s pivotal for the longevity of your patio.
Moistening
Next up, we gently spray the patio with a garden hose. This isn’t a shower; think of it as a light misting. The goal is to activate the polymeric sand without washing it away. This step might need repeating. You’ll add more sand, sweep, and mist again until the cracks are completely filled and the sand is settled. This process ensures the sand is activated throughout, solidifying the entire structure.
Backfill Edging
Finally, we address the edges of your patio. The backfill edging is both aesthetic and functional. By adding soil, sod, or other landscaping materials around the edges, we achieve a few things:
- Aesthetic appeal: It creates a seamless transition between your patio and the rest of your garden or yard.
- Stability: Helps to lock everything in place.
- Protection: Guards against erosion at the edges.
This step is like framing a masterpiece; it highlights the beauty of your brick paver patio while ensuring the structure is secure and integrated with the surrounding landscape.
By focusing on these finishing touches, JM Mento Landscape Design ensures your brick paver patio is not only beautiful on the day of completion but remains functional and attractive for years to come. With the right care and these expertly applied final touches, your patio will be a space of relaxation and enjoyment for your family and friends.
Moving forward, maintaining your new patio is key. In the next section, we’ll cover some Frequently Asked Questions about Brick Paver Patio Installation, including cost comparisons, disadvantages, and more. Stay tuned to ensure you’re fully informed about your new outdoor living space.
Frequently Asked Questions about Brick Paver Patio Installation
When considering adding a brick paver patio to your outdoor living space, it’s natural to have questions. Below, we address some of the most common inquiries to help you make informed decisions.
Is a Brick Paver Patio More Expensive Than Concrete Pavers?
Cost Comparison:
– Brick Pavers: Generally, brick pavers are priced between $10 to $20 per square foot, including installation costs. This price can vary based on the type of brick, design complexity, and geographical location.
– Concrete Pavers: Concrete pavers typically cost between $8 to $15 per square foot installed. While less expensive upfront, they may not offer the same long-term value or aesthetic appeal as brick pavers.
Long-Term Value:
Although brick pavers might have a higher initial cost, they often provide greater durability and a timeless look that can enhance your home’s curb appeal and value. Brick pavers can last for generations, making them a wise investment for many homeowners.
What Are the Disadvantages of Brick Pavers?
While brick pavers offer numerous benefits, there are a few considerations to keep in mind:
– Maintenance: Brick pavers may require more maintenance than concrete pavers, including regular cleaning, sanding, and sealing to maintain their appearance and prevent weed growth.
– Consistency: As a natural material, brick pavers can show variations in color and size, which might be considered a disadvantage by some homeowners looking for a uniform look.
– Cost: As mentioned, the initial investment for a brick paver patio can be higher than that of concrete pavers.
However, many find that the charm and durability of brick pavers outweigh these potential drawbacks.
How Much Does It Cost to Install a Brick Paver Patio?
The cost to install a brick paver patio varies widely based on the project’s size, the complexity of the design, the type of bricks chosen, and your location. On average, homeowners can expect to spend between $10 to $20 per square foot for a professionally installed brick paver patio. This estimate includes materials and labor.
Factors Influencing Cost:
– Patio Size: Larger patios will require more materials and labor, increasing the overall cost.
– Brick Type: Specialty or imported bricks can add to the cost.
– Design Complexity: Intricate patterns or the inclusion of features like steps or walls can increase installation time and costs.
– Preparation Work: The condition of your landscape can affect the cost. Sites that require extensive excavation or grading may incur additional charges.
For an accurate estimate, it’s best to consult with a professional landscaping company like JM Mento Landscape Design. They can provide a detailed quote based on your specific needs and preferences, ensuring that your brick paver patio is a beautiful, durable addition to your home.
As you move forward with your project, a brick paver patio is not just an addition to your home—it’s an investment in your outdoor living space that can bring years of enjoyment and add value to your property.
Conclusion
When it comes to enhancing your outdoor living space, a brick paver patio stands out for its beauty, durability, and the timeless appeal it adds to your home. However, beyond the initial installation, the aspects of maintenance and longevity are crucial to ensuring that your patio continues to offer value and enjoyment for years to come.
Maintenance
Maintaining a brick paver patio is relatively straightforward, ensuring it remains an attractive and functional part of your outdoor space. Regular sweeping to remove debris, occasional rinsing with a garden hose, and the application of a suitable sealant every few years can keep your patio looking pristine. Moreover, the inherent design of brick pavers allows for easy replacement of individual pavers if they become damaged or stained, ensuring your patio always looks its best with minimal effort.
Longevity
One of the most compelling reasons to choose a brick paver patio is its longevity. Properly installed and maintained, a brick paver patio can last several decades. The key to unlocking this durability lies in the installation process—ensuring a stable base, correct placement of landscape fabric and sand, and the use of polymeric sand to lock the pavers in place. These steps help prevent shifting, sinking, and weed growth, all of which contribute to the long-term stability and appearance of your patio.
JM Mento Landscape Design
At JM Mento Landscape Design, we understand the importance of creating outdoor spaces that are not only beautiful but also enduring and low-maintenance. Our team of experts is dedicated to providing high-quality installation services that ensure your brick paver patio exceeds your expectations in both aesthetics and longevity. From the initial design consultation to the final installation touches, we work closely with you to bring your vision to life, ensuring that your new patio becomes a cherished extension of your home.
Investing in a brick paver patio with JM Mento Landscape Design means investing in an outdoor living space designed for lasting enjoyment. Let us help you create a stunning, durable outdoor area that you and your family will enjoy for years to come. Contact us today to start your journey toward the outdoor space of your dreams.

0 Comments